You might think you know what a loofah is–that brightly colored, perpetually wet, plastic soap scrubbie dangling in your upstairs shower–so gross, am I right? But you might be surprised to learn that genuine loofah, the inspiration for the shower scrubbie, is not plastic and gross–it’s actually a plant, and you can grow it pretty easily.
Loofah gourds are related to cucumbers, & are grown similarly. Sow seeds 8-12 inches apart in nutrient rich soil, and water consistently to soil moist. They need a long growing season, & strong support for the heavy vines. Harvest loofah young to eat as a vegetable, or at maturity for its fibrous sponge.
Loofahs are exciting plants to grow, but they are definitely not the easiest. In fact, they’re pretty mean little buggers who’ll fight you every step of the way. I’ve plenty of experience failing to grow loofah, but those failures taught me what’s needed to do it right. Read on while I reveal everything I’ve learned from growing (and not growing) loofah gourds at home!

Loofah background
Loofahs originated in southern Asia, and are cultivated from the Middle East to Southeast Asia. They’re a tropical & subtropical plant, so they prefer a long, warm growing season.
Loofas are actually part of the Cucurbitaceae (AKA gourd) family. So, if you’ve grown cucumbers, pumpkins, or melons, growing loofah will be similar.
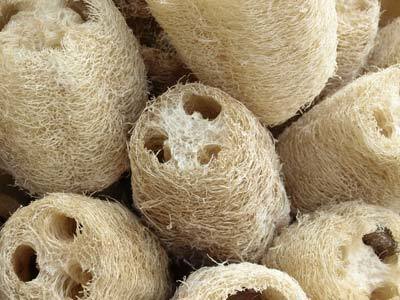
Loofah gourds can be harvested early to eat as a vegetable, or you can let them ripen on the vine and harvest for the fibrous sponge that forms inside.
Loofahs are NOT sea sponges. Sea sponges are actually a marine animal, and although sea sponges have some similar uses as loofah, loofah is a plant.
Loofah is the only plant we know of that can be grown for its sponge! How cool is that?
Loofah varieties
The first thing you should do is decide which type of loofah grower you want to be.
- Are you most interested in growing them for food?
- Do you have dreams of harvesting the sponge to make eco friendly and sustainable products for your home?
Or, if you’re like me, maybe you want to do both!
Some varieties of loofah are better than others for specific uses.
For example, some loofahs have bitter skins and won’t taste good; others will taste delicious, but they might be too small or awkwardly shaped for ideal home use.
When I set out to grow loofahs, I spent hours and hours trying to figure out the differences between all the seeds and species, but everything that I read only left me more and more confused.
The simplest and most helpful distinction I’ve found is “angled” loofah versus “smooth loofah”.
- Angled loofah (often marketed as “Chinese okra”) has ridges on the gourd, and is the most popular loofah for eating.
- Smooth loofah, (sometimes called “dishcloth gourd”) is most commonly grown for the sponge.
Of course, there are many more varieties suitable for each use. But if you’re just getting started, understanding the main varieties–angled vs. smooth, or “Chinese okra” vs. “dishcloth gourd”–will simplify your life so much!
Don’t worry, you will learn all of the complexities of loofahs to develop your own personal preferences as you become a more experienced loofah grower.
How to plant and care for loofah
Starting seeds
When it’s time to plant your loofah, soak the new seeds in water for 12-24 hours before planting them. Loofah seeds have a tough outer shell, which means they will take longer to germinate than many of your other seeds (because they’re mean). The soaking step will help to reduce the amount of time the seeds take to germinate.
Also, make sure you’re using new seeds! Older seeds that have been sitting around in your shed since last year are less likely to germinate. I ignored this the first time and used old seeds that I had gotten the year before, and most of my seeds never sprouted. The li’l fellers never came out to play.
It was sad.
So when should you plant your seeds? Of course, this depends on where you live. If you live in zone 6 or lower, you will need to start your seeds indoors 6 weeks before your last frost date.
When the soil and air warm up to about 65-75 degrees Fahrenheit, harden your plants off for a week or so before planting them in full sun.
If you live in zone 7 or above, you can just direct sow seeds into the garden as soon as the soil warms up.
How long does loofah take to grow?
Timing is especially important if you’re growing loofah for the sponge. The fruits will take 150-200 days to reach maturity (hint: that’s more than 4 months).
To make things even more difficult, loofahs have to be harvested before the frost hits, or they’ll rot & be unusable.
Planting them too late in the season will mean no sponges for you this year (and yes I’ve been there).

Planting loofah seeds
After soaking the seeds, plant 3/4″ deep in hills (1-3 seeds per hill) about 12″ apart in an area with FULL sun.
I repeat: full sun.
Loofah will not grow without full sun.
I made this mistake. I wanted to plant it where I wanted to plant it, and I was determined to have my way. “How much could a little shade possibly hurt?” I said. Well, I’ll tell you how much: a lot. Save yourself the disappointment and plant in full sun.
I always plant loofahs in hills, just like cucumbers. The hill system is used for large vine fruits, like melons and loofahs.
To make hills, scoop the soil with your hands to form flat, circular mounds about the size of a frisbee. The soil that is collected in the mound stays warmer, promoting the growth of the seeds.
This system also helps with drainage and nutrient absorption, and since loofah can be so difficult, I like to use every advantage that I can.
When planting, remember to add a little fertilizer or compost to the soil to encourage healthy growth.
Water the seeds consistently, keeping the area moist until your seedlings sprout. Remember, these seeds will not sprout as quickly as many of your other vegetables, so don’t become discouraged too quickly and slack off on the watering.
During the growing season
When your seedlings reach about 2″ tall, thin them so that there’s only one plant per hill.
If you don’t thin plants that are too close together, they won’t have enough room to grow, they’ll steal nutrients from each other. They may even die.
Pro tip: thin them early.
As your loofah plants continue to grow you will need to keep watering them frequently, trying to keep the ground moist. But let’s be honest here: this doesn’t always happen. I’m a simple home gardener, a hobby gardener mostly, and the ground around my loofah plants (or any of my plants) is not moist all the time.
Reality check: BUT, watering really does matter!
With loofahs, if you don’t water them enough, you don’t get any loofah–end of story.
The loofah gourd is made up of mostly water, just like a cucumber or a tomato (or a human). So, water loofahs as much as you can, doing your best to keep the ground moist, but not soggy.
And just pay attention to the plant itself–it’ill tell you if it’s thirsty or in distress (in curling screams).
Pruning loofah
Pruning the loofah plant is pretty simple. As the plant begins to grow more branches, cut off the first 3 to 4 lateral branches of each plant.
There should be at least a foot (12″) between the ground and the first set of lateral branches.
Later on, you’ll need to pinch off the first few flowers that the loofah plant produces.
It feels harsh, I know, but pruning will maximize the overall yield of the fruit and impact the quality as well.
Besides, you can eat the flowers, so why not?

Supporting loofah vines
And finally, it’s really important to be sure that you have adequate support to hold up your loofah vines.
These plants can be enormous and the gourds are heavy.
The vines average about 10 feet tall, but honestly they can grow much taller. They’ll take up all the room that you give them.
Ideally, you’ll be able to plant them against a tall fence or even against a building. I plant mine in the back of the garden against both a fence and a garden shed, and the vines clamber up on to the roof of the shed and gourds grow up there!
If loofah plants don’t have strong enough support and the vines are crawling on the ground, they’ll be far more susceptible to pests, diseases and rot.
Keep them propped up as much as you can.
Common problems
If your loofah plants are showing signs of stress and disease, you’re not alone. They are susceptible to the same kinds of pests and diseases as your other gourds and cucumbers, chiefly:
- beetles (not the good kind who have a incredible back catalog of iconic songs that’ve endured for more than 50 years)
- over-watering
- under-watering
- inconsistent watering (guilty as charged).
Beetles
Cucumber beetles and squash beetles for example, will really like (and by “like” I mean “destroy”) your loofah plants. You can combat beetles by routinely applying your preferred insecticide solution to the plants. I make my own natural and organic solutions at home, and I also use diatomaceous earth regularly throughout the garden every year.
Watering
The main problems I face with loofah are almost always related to the amount of water they are (or are not) getting.
Over-watering
If you don’t have good drainage in your garden and you’re over-watering the plant, this will essentially drown it and cause the roots to rot.
If the edges of the leaves are browning or the plant seems to be suddenly infected with pest issues, then over-watering might be the problem.
Look for pooling water under the plant or excessive dampness.
If drainage is your problem, try amending the soil as well as you can with a mixture of sand, mulch, and compost. It may also help to thin the plant by removing some of the branches that are blocking the sunlight from reaching the soil, thus creating a dark, damp and disease-friendly environment underneath.
Under-watering
More often than not though, my problem is that I’m not watering the loofahs enough. Drooping leaves, rotting branches and fruits, and stunted or slow growth are all signs of under-watering.
The soil around the plants should not be dry and crumbly. If this happens to you, give the loofah plants some extra water and attention for a few days and see what happens–they’ll probably start coming back to life within the week.
If you feel like you’re watering consistently but your plants are still dry and stressed out, try adding a layer of mulch around the base of the plants. The mulch will keep the sun from drying out the soil too quickly, which will of course help to keep your plants watered for longer.
No gardener is perfect and growing loofah can be challenging, but with a little perseverance you’ll be the coolest gardener on the block.
It’ll all be worth it when you get to surprise your friends at dinner parties with your funky little gourds, and give homegrown gifts at Christmastime.

How do I eat loofah?
Loofahs are mild tasting gourds that are rich in many essential vitamins & antioxidants. They are popular in some Asian cuisines, so if you eat out much, you may have even eaten them before and don’t even know it.
If you’re growing loofahs to eat, you’ll want to pick them when they are still young. The edible gourds will be green and usually somewhere around 4-10″ long, similar in size to your other summer squashes.
You don’t need to peel smaller loofah fruits (unless you want to). Sometimes the skin and ridges on the bigger gourds can become too tough and bitter for eating, and those will need to be removed.
For cooking the loofah gourds, there aren’t really any rules. You can fry it in a stir-fry, steam it with some garlic and oil, bake it with meats and other veggies, toss it into a curry or stew, pickle it, even eat it raw–whatever suits your taste buds. When cooking it, allow a similar amount of cooking time as you would for zucchini.
Oh–and don’t forget about the flowers! Loofah blossoms are edible too, just like squash blossoms. They are white or yellow, depending on the variety of loofah you grow, and are such a pretty little addition to an elegant plate.
Harvesting the loofah sponge
Here you are: after more than 4 months of wrestling with and nurturing your loofahs, it’s finally time to harvest the luscious interior sponge! Here’s how.
How to tell if a loofah is ripe
Some people will tell you to let the gourds mature completely on the vine–you can do it this way, but I don’t recommend it. If you let them mature for too long some of them will grow mold inside (no one warned me about this, so you’re welcome).
Ready-to-pick gourds will become dry and lightweight, but not turn completely brown. A little bit of green and yellow on the skin is not a bad thing.
If you’re still not sure whether it’s ready, feel the gourd. Is it lightweight? When you squeeze it, it should give a little–that is the sponge inside.
Just remember that they have to be picked before the first frost hits (this usually ends up falling around the end of October for me in zone 7a).
De-seeding & cleaning the loofah
When you’ve picked your loofah and are ready to peel it, hit the gourd against something hard (like a countertop) to loosen the seeds.
Take the bottom (the side that was not hanging on the vine) and cut it off.
Shake the loofah vigorously to make the seeds fall out of the bottom (you won’t get all of them out but this’ll help).
Use a pair of scissors to slice the skin open vertically, and then peel the rest of it off with your hands, kind of like you would a banana.
After you’ve removed all of the seeds and skin, you’ll need to wash the sap off of the sponge. You’ll have noticed by now that the inside of the loofah is really slimy and kind of gross–just wash it until it’s not slimy anymore.
The quickest way to do this would be to use a garden hose and spray the sponge on a high setting until the slime is gone. But I find it particularly difficult to manhandle a powerful hose in one hand and a slippery gourd in the other. So, I prefer to just do it in the sink.
It takes longer but I look less ridiculous and my sponges don’t fly across the yard.
Final steps before you use your loofah
The color of the interior sponges varies from white to dark brown, maybe even black, though that hasn’t happened to me. If you’re unhappy with the color of your sponge, you can soak it in a diluted bleach solution (one teaspoon of bleach to a gallon of water) for a few minutes. I’ve never done the bleach bath because I don’t love the idea of using a bleached product on my skin.
Instead, if the sponge looks too unappealing, I wash it thoroughly with borax or castille soap until I’m satisfied. Baking soda and lemon juice or white vinegar would probably work just as well.
If the sponges still don’t look good enough for you, just relegate them to the “dirty jobs” pile, and use them to clean floors or bathtubs. No need to throw them away!
Once you’ve thoroughly cleaned the sponges, all you have to do is dry them.
Lay them out in the sun on a towel for a day or so, or until they’re completely dry.
Don’t leave any moisture in them, or they’ll become moldy.
Now your hard-earned sponges are ready to cut and use! I love having a supply of homegrown sponges to use for baths, dishes, and sweet little gifts.

What if my loofahs aren’t ripe?
Maybe you didn’t plant them early enough, maybe frost is coming sooner than you expected, maybe you ignored the frost warning but now it’s about to snow (oops). Whatever the reason, the sponges that you have been working so hard for might have to be picked before they are ready.
Don’t panic just yet!
You can still use them–it just takes a little bit more work.
Here’s how to dry loofahs that are too green.
- Peel and wash the immature gourd the same way you would a mature gourd. Just know that peeling immature sponges is harder and a lot messier because they will still be wet and juicy inside.
- Wash the exposed sponge thoroughly, making sure there are no fruit juices left inside.
- Use the same cleaning suggestions given earlier to achieve the cleanliness and color desired.
- When you’re satisfied with the sponges lay them out on a towel to dry, somewhere nice and warm.
Drying will take longer if done indoors, and these sponges may not be as large or as pretty as your mature ones, but they’ll still be useful.
Related Questions:
How long does it take to grow loofah?
If you’re growing loofahs for harvesting the sponge, they’ll take 150-200 days before reaching maturity. If you want to grow loofah to eat–like you would zucchini–the loofahs will typically be ready to harvest 2-3 weeks earlier, within 130-170 days.
Can I grow loofah in containers?
Yes, you can grow loofah in containers. Use a 12″ container or larger, since the roots will grow pretty deep. Place the container in a location that has full sun (and grow lights to supplement for indoor growing), and be sure to set up supports for the climbing vines. This is a great option if you live in a shorter growing season and need to keep them inside longer, or if you have poor soil and drainage quality in your garden.
What can I make with loofah sponges?
There are all kinds of products and gifts you can make easily with your sponges. Soap bars and multi-purpose scrubbers (dish, body, bath, etc) are the most common uses, but I’ve even seen artwork and flower vases made of loofah!
What are the benefits of growing loofah sponges?
Besides being a fun gardening venture, growing loofah provides you with a supply of non-toxic, organic, and compostable sponges that you can use, give away, or even sell. The satisfaction of using something safe, natural, and homegrown while saving money is benefit enough for me!