Many people like to grow garlic not only because it’s useful but also because it’s easy to grow–even indoors. Growing your garlic indoors is a satisfying experience and everyone should try it. In a few simple steps, you’ll learn how to grow fresh green stalks and garlic bulbs indoors.To grow garlic indoors: plant cloves from mature garlic bulbs 2-3″ deep, and about 4″ apart. Use well-drained soil. Keep the soil moist but not soggy. Full sun is best, but not required. Garlic bulbs are ready to harvest in about 8 months. Garlic greens, however, are ready within 2 weeks.
If you’re not sure about where to start or you’re learning about gardening and want to know how garlic is grown, that’s OK! Read on to learn the exact steps.
You can also check out our definitive guide to indoor growing.
Garlic background
Didja know that garlic is actually related to grasses? True fact! In science-speak, that’s because it’s in the monocot clade.
A mono-what? Monocot just means that when the seed sprouts, it’ll have just 1 leaf. Monocots are different than dicots, which have 2 leaves that sprout from their seed–like beans.
Most garlic varieties are native to central Asia, but there are a few varieties of garlic native to North America (Allium canadense–commonly called wild garlic) grows in woodlands, and even in shady spots & along streamsides in New Mexico.
In fact, when I lived in Chicago (which was coincidentally named after the Native American Miami-Illinois word for wild onion), I remember seeing folks collecting wild garlic that grew in the springtime along the Chicago River floodplain, right inside the city limits.
Garlic Varieties
There are many different kinds of garlic available out there but we can categorize them into 2 main types: hardneck and softneck garlic. Both garlic varieties require similar planting techniques, and take the same amount of time to grow into bulbs, but they need different growing conditions. They each have distinct features, so it’s important to know what they are so you can choose the type of garlic that suits your needs.
|
|
Hardneck |
softneck |
|---|---|---|
|
Temperature |
30-50 degrees |
Tolerates warmer temperatures |
|
Storage life |
4-6 months |
9-12 months |
|
Productivity |
Fewer cloves, but larger clove size |
More cloves, but smaller clove size |
|
Varieties |
|
|
Hardneck
Hardneck varieties are grown in colder environments and need air temperatures between 30-50 degrees to yield large bulbs.
They produce a flowering stalk called scape from the center of the bulb which can be used in salads because of its mild, garlic flavor.
Hardneck varieties can be easily peeled but they do not store well and begin to deteriorate within 4 to 6 months of harvest.
They also produce fewer but larger garlic cloves than their softneck counterparts. However, they have a unique taste and many people find them more flavorful than softneck varieties.
Some examples of hardneck garlic are Rocambole, Purple Stripe, and Porcelain.
Softneck
Although softneck varieties do best in cool temperatures they are more tolerant to warmer climates compared to hardneck varieties.
They’re commonly sold mainly because of their ability to stay fresh for 9 to 12 months.
They don’t produce a scape which makes their stems soft–hence their name–making it easier to create long, pretty braids for storage.
They’re hard to peel, but they produce more cloves, and their cloves are generally larger than their hardneck varieties.
The most commonly known softneck varieties are Artichokes and Silverskins.
What you need
One of the advantages of growing garlic indoors is that you can grow it any time of the year. You can minimize external factors like rainfall, pests, and weed, and maximize efficiency by controlling as many factors as you want. That’s the beauty of growing indoors!
Garlic Cloves
Although garlic cloves from garlic that you bought from the local grocery store can be used, it’s better to use certified “seed” garlic from local garden centers or even online for better results.
By “seed” garlic, I mean garlic cloves or bulbs that you’ll use for growing. (Most folks generally don’t grow garlic from actual seeds).
That’s because cloves from a grocery store garlic may not sprout because they’re sometimes chemically treated so that they won’t sprout.
Having certified organic garlic will increase the likelihood of a better harvest with fewer chances of diseases. You can even use the cloves from the harvested garlic bulbs–that way, you can get the same yield from garlic you’ve already grown.
Container
Find a pot 8-10 inches deep and at least 6 inches in diameter. The container must be large enough to fit the garlic bulbs that will grow out of the cloves.
Cloves are planted at least 2 inches apart, so you need to choose a pot according to the size of the cloves and the number of cloves you’re planning to plant.
Using a sharp tool like a nail, punch holes at the bottom of the container to allow drainage of water. You can use a thin wire screen or gravel if the drainage holes are too big–that’ll prevent soil from coming out.
Place a saucer or any flat container below your pots to collect excess water and soil that may come out of those drainage holes.
Suitable Soil Mix
Garlic prefers loose loamy soil that’s well-drained and contains plenty of organic matter.
You can create your potting mix by mixing garden soil and organic compost. You can also buy soil labeled as potting soil, vegetable soil, or garden soil; typically those soil varieties will do just fine for garlic.
Fertilizer
Fertilizers aren’t necessary, and you can skip them, but they can speed up growth, and even yield a better harvest.
If you decide to use fertilizer, an all-purpose bone meal or fish meal fertilizer is a good bet for growing garlic.
For garlic plants, we are focusing mainly on root development. University tests showed that applying more nitrogen typically yielded higher garlic production across 7 different soil types. So, it’s a good bet that adding a nitrogen fertilizer to your soil will boost your production.
Typically, a nitrogen fertilizer with applications of 100 or more pounds per acre is plenty for garlic.
Location
Now all you need to do is find a suitable location to place your container where it can receive at least 6 hours of direct sunlight every day and is away from pets and children.
You can place it near a window or have your own isolated space for gardening.
You can also purchase LED grow lights which can be more effective for indoor gardening.
Garlic can grow well at room temperatures but if you can monitor the temperature, it’s best to keep the air temperature between 32-50 degrees Fahrenheit for the first 2 months.
Planting and General Care while Growing
Garlic isn’t difficult to take care of, and won’t bother you if you keep it happy. All you need to do is stay consistent and follow all the steps carefully.
Starting Seeds
If you’re obtaining seed cloves (remember, we’re using the cloves–not actual seeds–to grow our garlic) from your own garlic, choose cloves from bulbs that produce large cloves–that way, you’ll be able to grow garlic with larger bulbs.
If you can’t provide temperatures below 50 degrees Fahrenheit, place the garlic cloves in the refrigerator for 6 to 8 weeks prior to planting. This is because the cloves need a cold treatment to germinate properly and grow larger bulbs.
If you’re growing softneck varieties, then you can skip this step, but keep in mind that your resulting garlic cloves & bulbs may be smaller.
If you’re keen to grow garlic from seed that you’ve grown, take a look at the guide for pollinating indoor plants.
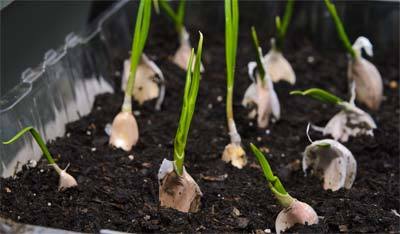
Planting
OK, let’s get our hands dirty!
First, you’ll split the head of the garlic bulb to separate the cloves. Just do this with your hands.
DO NOT REMOVE the skin of the cloves! This is important to ensure proper growth of the cloves.
Next, carefully plant the cloves halfway inside the soil with the pointy side facing upward. The cloves should be at least 2 inches deep into the soil.
Plant other cloves 2 to 4 inches apart depending on the size of the cloves.
Make sure the cloves are properly immersed by lightly pinching the soil surrounding them.
Congratulations! You’ve successfully planted the cloves, and all you need to do is take care of these li’l babies.
Sunlight and Temperature
Garlic cloves love the sunlight. Make sure they receive at least 6 hours of sunlight every single day.
If you have doubts, you can supplement their light using LED grow lights.
Make sure the temperature isn’t too hot–otherwise the cloves will stop growing. Keep the temperatures between 60-80 degrees Fahrenheit, but not exceeding 90 degrees.
Watering
The next and most important part of growing any plant is watering. You need to make sure that you’re not overwatering or underwatering your garlic plant by checking the moisture of the soil.
Water the soil with a gentle flow until the soil is completely moist without having a layer of water on top.
Another technique to ensure proper watering is to keep adding water until you see water coming out of the bottom of the pot or container.
The soil you’re using should be semi-permeable–which means it should allow water to easily travel through.
As the bulbs grow, you’ll reduce water gradually.
If you’re harvesting garlic bulbs, stop watering when the leaves get dry & fall down–this is usually a week or 2 before you harvest the bulbs. Ceasing watering at that time also avoids staining the bulb skin and helps prevent diseases. Ceasing watering also improves the flavor of the garlic.
Adding Fertilizer
If you’re planning to use fertilizer, you should add some fertilizer into the cloves before even planting them.
Fertilized soil can result in earlier germination and lead to faster growth.
Fertilize the soil not more than twice a month when shoots and scapes begin to grow.
Also make sure to spread the fertilizer evenly around the soil.
Harvesting, Curing and Storing
If you continue to treat your garlic well with proper conditions and nutrients, you’ll harvest sooner and your garlic plants will be more productive.
If you’re growing hardneck garlic, you’ll see the growth of scapes–which are the flowering stem–but with softneck garlic, however, you’ll only harvest one large bulb.
Garlic greens & scapes
Within 2 weeks you should have garlic greens.
Allow these shoots to grow 8-10 inches tall, and then start clipping the bent ends.
If you’re growing hardneck garlic, scapes will begin to form around 4 to 6 weeks before the harvesting time for your garlic bulb. It’s best to harvest these scapes before they start to flower to preserve the taste of the scapes, and redirect energy to the growth of the bulb. Clip them off 1 inch from the bulb, and now you’re ready to use them as a flavoring or garnish.
Garlic bulbs
It usually takes anywhere between 6-10 months to harvest garlic bulbs, so patience is necessary.
Once the leaves and the foliage start to turn brown or yellow, you need to get ready to harvest your garlic.
Stop watering completely, and keep the garlic in the soil for 2 to 3 weeks.
When you see almost half of the leaves turning brown, check the size of the bulb by brushing away the soil gently around the bulb.
You can also dig up 1 or 2 bulbs to see if they’re ready.
It’s better to harvest too early than too late–you don’t want to harvest mushy, rotten bulbs.
To harvest, simply dig the soil around the bulb and pull the bulb out from the soil.
DO NOT pull from the leaves or scape otherwise, it will damage the cloves in the bulb.
Be careful not to bruise the garlic or tear the garlic skin or it will rot very soon. The skin or wrapping of the garlic should be thick and intact.
Curing
Move the garlic bulbs out from any sunlight immediately after unearthing them, and store them in a dark, dry and well-ventilated area.
You can hang them in bundles or tie them with strings during the curing process.
When the whole stalk has turned brown, and the bulb has formed several layers of papery skin, they’re ready for cleaning and storage.
Cleaning
Once the garlic has dried, cut off the stalks about an inch above the bulb. Trim the roots, and wipe off any dirt from the bulb with water and a clean cloth. Remove dirty and broken wrapping but be careful not to remove excess wrapping while cleaning. Check for any rots on the bulb–just throw away any rotting bulbs.
Storing
Your bulbs should now be stored in a cool, dry place.
Garlic will keep longest around 32 degrees, but can also be stored for 3-5 months at 60 degrees.
The flavor is improved as the bulbs dry. Garlic can be stored for several months without going bad. You can even make cool braids with softneck varieties and show off your skills.
Common problems & fixes:
- Wrong cloves: if you use cloves from a supermarket garlic bulb, chances are they won’t grow. Secondly, if you choose to grow small cloves, they won’t grow into large bulbs, and sometimes, they may not grow at all. It’s best to use large and higher quality cloves from a garden store or other supplier.
- Not enough sunlight: If you don’t see shoots within 2 weeks, it’d be a good idea to either relocate the pot to a different location with better sunlight, or invest in LED grow lights for efficient growth of garlic.
- Temperatures too high: If you’re growing indoors, it can be difficult to maintain temperatures below 50 degrees Fahrenheit, and some garlic varieties don’t grow well in higher temperatures. It’d be best if you have a separate room or place where you can install an air conditioner to keep the temperature cool.
- Soggy Soil: Avoid overwatering and check the drainage of the soil and container before planting the cloves. Garlic doesn’t like drowning in water!
- Excess Fertilizer: If you’re unfamiliar with fertilizers, you should first try growing without using any. There are a ton of different kinds of fertilizers, and it can get confusing for beginners. If you choose to use one, don’t use it more than twice a month, and use it only when the scapes start growing.
- Damaged skin while growing: You need to be gentle with the bulbs while they’re growing. If they get exposed, they can easily rot. The best solution is to avoid using tools, and instead just use your hands. Accidents can happen!
- Harvesting too early: If the wrapping is thin and falling apart right after you took them out of the soil, you’ve harvested too early. Put the bulbs back in the soil, and wait for another week.
- Harvesting too late: If the bulbs are splitting and breaking through the wrapping, you’ve left the garlic in the ground for too long, and the garlic is exposed to disease and rotting. So it’s better to throw it away. Remember that it’s best to harvest when only the leaves close to the bulb have turned brown but most of the leaves on top are still green.
- Improper curing: If you store the bulbs in a place that’s humid, hot, or receiving sunlight, your garlic won’t properly dry, and its flavor will suffer. You can keep them in a box, and put 2 holes in it and place the box somewhere dry. Like a pet rock!
Related Questions
How long does it take to grow garlic?
Garlic greens typically grow within 2 weeks of planting, but may take 1-2 more weeks before you can harvest. Garlic bulbs & cloves take much longer–typically 6-10 months. So, if you want garlic cloves, have patience.
How to grow garlic in a plastic bottle?
You can use a plastic bottle to grow small cloves. Cut the bottle in half, and pour water into the bottom half of the bottle. Punch a hole into the bottle cap, and fill the top half of the bottle with garden soil. Place the top half into the bottom half of the bottle, then plant cloves into the soil with the pointy side facing you. Replace the water every week and you’ll see shoots growing within a week or two.
Can you grow garlic all year round?
Garlic is grown best during the winter season. Softneck garlic can be grown in warmer climates not higher than 90 degrees Fahrenheit. If you’re growing garlic indoors, you can grow garlic any time of the year by providing enough sunlight and water.
Can you grow garlic in water?
Garlic can be grown in water with a few tricks. You’ll need a soil-less hydroponic medium such as vermiculite mix, and provide temperatures between 30-50 degrees Fahrenheit. If you’re growing exclusively in water, you’ll likely need to add a nutrient solution to the water to ensure the plants have access to chemicals like nitrogen, phosphorus, and potassium.