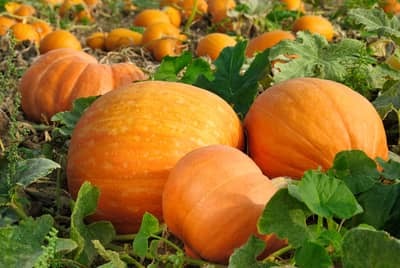
Whether you’re a first time- or veteran-gardener, growing pumpkins is a superb choice. From determining the right location and soil, to the proper ways to harvest the fruit, I’ve discovered some helpful tips and tricks for how to effectively grow pumpkins.
Put simply, growing pumpkins takes a long time, so it’s important to get your seeds in the ground early in your growing season. Pumpkin plants need full sun, and do well in any type of soil, as long as they get about an inch of water per week.
Throughout this post I explain ways to care for your pumpkin plant, problems to avoid and how to effectively harvest your pumpkins at the end of the growing season. Read on to determine how to successfully become a pumpkin farmer.
Choosing your site: Where will you grow your pumpkins?
When growing pumpkins, it’s important to determine the best location for your plant(s). You’ll want to consider a section of your yard that gets the most sun for optimum plant growth.
If you have buildings or a lot of mature trees and bushes that shade portions of your yard at different times during the day, planting in pots/planters so that they can be moved throughout the day would be a good option for you.
A tip for if you choose to plant in a large planter that may be heavy to move: set the pot on a dolly with wheels so that it can be pushed instead of picked up.
Pumpkin plants yearn for lots of space, so be sure to choose a place in your yard where they’ll be able to sprawl out (or up, if you’re planting in large planters).
Where to start: seeds or a seedling?
Seedling / starter plant
If you live in an area where your growing season is shorter, beginning with a starter plant might be a better option. That way, you can start growing indoors in late winter or early spring, and get a jump-start on the growing season. Seedlings & starter plants can usually be purchased at any of your local stores that sell fruit/vegetable plants.
Just make sure to get your li’l starter plant in the ground by late spring/early summer.
Growing pumpkins from seeds
If you’re starting from seeds, be sure the soil is warm (not below 60 degrees) and drains well.
If you have a short growing season, you can start the seeds in small pots indoors during early spring–or even late winter.
Plant about 4 seeds per container and then thin out the plant once greenery has sprouted (in other words, once the true leaves appear).
Pro tip: Be sure to introduce your plants that you started indoors to the outside elements slowly (a few hours a day) to gradually help them acclimate to harsher conditions before planting them in the ground. If you don’t do this, you run the risk of shocking your plants and having them die upon being thrown into the direct sun, wind and rain.
Care for pumpkins during the growing season:
Water frequently, as pumpkins are quite thirsty!
As your pumpkin plants begin to grow, they should be watered thoroughly each day.
If watering with a garden hose, water for a long time. If you can put it on soaker mode and walk away for a few minutes, this may be a solution for those of us who are not very patient when watering.
Personally, I prefer using drip irrigation set on a timer–that way, I won’t forget about watering, and my plants get consistent amounts of water.
Thorough watering (but NOT over-watering) is best for pumpkins & most plants. That’s because deep watering quenches the pumpkin plant’s insatiable thirst, but it’ll also encourage deeper root growth. And deep, healthy roots produce sturdier, more robust plants.
Also, be sure not to damage the plant leaves when watering. Focus on watering the soil surrounding your plants, where the roots are buried.
Mulch to retain moisture and repel bugs
To ensure your pumpkins retain the moisture you provide each day, mulch the area surrounding the plant. Wood chips and grass clippings make great, affordable mulch.
Not only does the mulch help to keep in the moisture for the roots, but it also helps to keep bugs and pests at bay.
If the plant & its soil is constantly soggy, that’ll be a virtual magnet for bugs & disease.
Fertilize to produce strong and healthy pumpkins
Pumpkins are pretty hardy, so even if you don’t remember to fertilize, that’s ok!
But if you’re looking to produce truly robust pumpkins, you’ll want to fertilize in three stages:
- Early on, use more nitrogen: Pumpkins suck in any nutrients you provide them, so it’s best to use a fertilizer high in nitrogen in the beginning stages of plant growth every week, as nitrogen helps the plant to develop lots of green leaves and vines.
- During flowering, use more phosphorus: Eventually your pumpkin plant will produce pumpkin flowers. At this stage in the plant’s development, it’s time to switch to a weekly phosphorus rich fertilizer to promote bountiful flowers.
- During pumpkin growth, use more potassium: As the flowers start to develop into pumpkins, it’s best to use a weekly fertilizer that contains a lot of potassium, as we want the pumpkins to become thriving fruit.
How to get big pumpkins: Prune regularly
By pruning your pumpkin plants regularly, the plant can focus on strengthening a few large fruits, instead of a bunch of small pumpkins.
Pruning is easy: as the plants begin to grow and extend, cut the plant a few feet after a pumpkin.
It’s helpful to bury the cut end of the plant in the soil below so as not to lose too much moisture from the plant.
Cutting back the plant also helps you keep control of the vines that may grow awry or overtop of one another.
A simple trick for how to grow pumpkins on a trellis
If you’re running out of room in your garden for the pumpkin vines to grow, or you’re growing the plant in a large planter, a trellis can be positioned above the plant so it can crawl and grow upwards.
Be careful though, because growing pumpkins on a trellis means the pumpkin fruit will be hanging in mid air. If the pumpkin gets really heavy, it could rip itself off the vine!
Supports can be fashioned so that the fruits grow in a hammock-like structure.
I like to use scrap cloth, cut into strips to tie the vines and pumpkins to the trellis–it’s a common trick that vineyard growers use for securing grape vines.
Tip to prevent misshapen pumpkins
As your pumpkins grow and mature, it’s important to rotate them carefully to avoid any misshapen fruits.
Yeah, it’s sometimes cool to grow a freaky-shaped Franken-pumpkin.
But most often, you’ll want a nice symmetrical pumpkin–the kind that Charlie Brown & Linus dreamed about.
To get nicely shaped pumpkins, it’s helpful to rotate the whole vine along with its the pumpkin so that the fruit doesn’t get torn from the vine too soon.
But don’t just start twisting the vines all willy-nilly, or you’ll tear the vine!
The rotation process should occur over several days so as not to damage the connection between the pumpkin and its vine.
Another option to avoid misshapen fruits is to place something soft underneath your pumpkin. For instance, if you have foam pieces handy, you can slip them underneath a pumpkin to avoid a flat spot.
Trick for how to grow odd shaped pumpkins
OK, so maybe you don’t care about the biggest, most globe-shaped pumpkin in town.
Maybe your thing is to have the weirdest, most memorable pumpkin.
So you can use a trick that was originally developed to grow cube-shaped watermelons in Japan. (Although they reportedly cost a whopping $83!).
Here’s the trick: You can enclose your young pumpkin in a transparent plastic or glass box or other shape. That way, as it grows, it’ll expand into the box. You might need to enlarge the box as the pumpkin grows. Some folks have used all kinds of shapes–flower pots, large glass jars–basically anything in which the pumpkin will fit.
Problems to avoid:
Not enough light
While pumpkin plants thrive on lots of water, they also thrive on lots of sun. They prefer to grow in full sun locations but partial shade will also suffice.
Too little sunlight won’t produce a robust plant, and this could affect the plant’s ability to produce pumpkin flowers, which yield pumpkins.
Over-watering
To avoid the issue of too much moisture with your growing pumpkin plants, be sure to water in the morning hours.
This gives the soil time to dry throughout the day, so as not to invite molds and fungi to the area.
Watering at night can cause the moisture to be too great. And, when the plant is too saturated without time to dry in-between waterings, you’re inviting disease & pests.
Pests such as beetles, bugs and fungi
Spiders and insects are normal occupants in a vegetable garden. However, there are certain bugs you want to keep at bay when growing pumpkins.
Squash bugs and beetles love the large leaves of a pumpkin plant. As a result, they can quickly decimate your plants–which means no pumpkins come harvest time.
It’s important to check your plant leaves weekly for any pest eggs. Be sure to remove them by carefully scraping them off without damaging the leaves.
If you missed the eggs and they have already hatched into insects, here’s a trick. Leave a thin piece of wood like a board in your garden at night, where the critters will congregate. In the morning, you’ll be able to squish them. Eeeww…
Rotting fruits
Nobody wants a pumpkin that’s soft and squishy on one side.
Keep your pumpkins rot-free by placing foam, cardboard, or wood beneath them as they begin to grow–that’ll help lift them off of the soggy soil, which is often the cause for rotten fruit.
Harvest:
Is your pumpkin is ripe for picking
As the pumpkin growing season nears the end, you’ll want to pay attention to the signs the fruit will give to tell you that it’s picking time:
- Deep color
- Tough rind
- Hollow sound
- Hard stem
Once your pumpkins have reached a deep orange color, they’re probably ready to be plucked from the vine.
Their rinds will be tough: if you try to puncture it with your fingernail, it should resist. The pumpkin should feel empty inside and when you tap on it with your finger, and it should sound hollow.
Finally, if the stem feels hard, it’s ready for harvesting!
How to remove the pumpkin from the vine
Removing ripe pumpkins from their vine is simple: Use large scissors or gardening shears, and cut the stem off of the vine.
If you’re planning to carve a pumpkin for Halloween, you’ll want to make sure to cut the stem a bit longer. That way, you’ll have a handle for the top of your jack-o-lantern.
Be careful not to twist or rip the pumpkins from the vine. You don’t want to tear off the stem altogether. If this happens, the pumpkin might begin to rot sooner.
How long do pumpkin seeds last?
Pumpkin seeds can last up to 4 years!
Technically, they can last longer, but their germination rate will be lower. That means that fewer of the seeds will sprout.
If you want to plant pumpkins from seeds next year, you can save the seeds from this year’s harvest. That way, you’ll have pumpkin seeds that’ll still be good by spring.
There are a few simple steps to follow when harvesting pumpkin seeds to save for the spring:
- Scrape out as many pumpkin seeds as you can from the inside of an existing pumpkin.
- Rinse them off under cool water to get rid of any leftover pumpkin pulp.
- Lay them out in a single layer on a towel to dry out for a week.
- Choose only the largest seeds (they have better chances of germinating than the small ones)
- Put them in an envelope in a cool, dry location like your refrigerator until you’re ready to plant them in the spring.
Some plants–especially those grown in cold climates–are more likely to germinate if you fool them into thinking they’ve survived through winter. To do that, you need to simulate winter for the seeds. The easiest way to do that is to put the seeds with some moist (but not soggy) soil all in a plastic bag. Then, store it in your refrigerator for at least 8 weeks.
If you have old pumpkin seeds that you aren’t sure are still good, you can test them prior to planting.
An experiment done in many elementary schools across the country involving bean seeds, moist paper towels and plastic bags to grow a bean plant is the same experiment you can do with your old pumpkin seeds.
Simply take a seed or two, place it between damp paper towels. Then put that inside of a plastic sandwich bag, and then store in a warm place. In about a week, the seeds should have sprouted, indicating healthy seeds. If no seeds sprout, that means the seeds are past their prime and won’t produce a pumpkin plant, let alone any pumpkins.
Related Questions:
Can I plant pumpkin seeds from a store bought pumpkin?
Yes, you can plant pumpkin seeds from a store bought pumpkin. But unless the fruit at the store is labeled “heirloom,” you may be purchasing a hybrid version. So, hybrid seeds probably won’t yield very good results. If a pumpkin is from an heirloom fruit, you’ll have better chances of successfully growing pumpkins.
How long does it take to grow a pumpkin?
Most varieties of pumpkins take 90-100 days to grow, but some can take 120 days. If your soil is poor in nutrients, or if the pumpkins get little sunlight or water, growing time could exceed 140 days. So, it’s best to plant pumpkins as early in the spring as possible. You can even start seeds indoors in late winter.
What time of the year do you plant pumpkins?
Since pumpkins need a long growing season and warm, moist soil, get them in the ground at the beginning of your growing season. If you live in northern states, plant pumpkins in late spring, when there’s no longer any danger of frost. More southern states can plant well into July.
What to put under growing pumpkins?
To grow well-rounded pumpkins without rot, it’s a good idea to put something underneath growing pumpkins. For example: foam or styrofoam with holes drilled into it, provides for drainage purposes underneath pumpkins. You can also use nylon or netting to hold the pumpkin up if it’s growing up a trellis.