As an avid gardener, and a hopeful future homesteader, I’ve been doing extensive research as to how to build an easy and effective hoop greenhouse, also known as a hoop house or high tunnel. The purpose of a hoop house is to extend the growing season of produce by months at a time if you live in colder climates, such as the Northern United States or Southern Canada.
To build a hoop house, you’ll need tubing (like PVC or electrical conduit pipe) and connectors, plastic (usually polyethylene sheeting), and simple doors. The most important consideration is siting: choosing a location, since you want the hoop house to get plenty of sunlight.
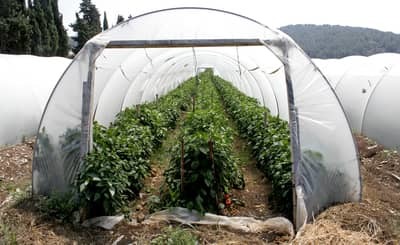
It is relatively easy to build a hoop house, as I will describe in detail in the steps below. The main factors to consider are location, base size, length of PVC hoops, type of greenhouse plastic you are going to use, and what type of doors you plan to construct. The average hoop house size is approximately 10’ x 21’ and 7 ft. tall to 12’ x 24 ft’ and 6’8” tall. Regardless of which size you wish to build, the most important factor to consider when building a hoop house is the location. Factors to consider when determining the location of the hoop house include:
- The hoop house’s proximity to nearby facilities
- Wind block provided by nearby structures
- This is important for the protection of plants as well as the maintenance of the hoop house itself
- North – South Orientation (not often recommended)
- However, will be more beneficial for the distribution of light
- East – West Orientation (often recommended)
- Will attract more sun during the cold months of September – March
- Is preferred for season extension
- Hoop houses should be spaced at least one building-width apart
- Avoids shadows casting on neighboring buildings
- Helpful with snow removal
At this point, you’re ready to construct a hoop house, but how do you build it? Again, it is fairly simple. Here are a few basic steps to building a hoop house. Don’t forget, a helper is key!
Step 1: Choose Your Building Site
- A flat and level site that is well-drained is ideal
- Do not choose a location that floods easily
- Line up with predominant winds for the most aeriation
Step 2: Choose a Location for your Hoop House
- Choose a stone-free location to ensure easy set-up
- It will be easier to drive stakes into stone-free ground
- Better for small animals / livestock
- Ensure an East – West Orientation
- As stated above, an East – West orientation attracts more sun
- Locate near other buildings / structures for convenience
- The less walking you have to do between structures, the better for harvesting
- Level the location
- This is very important to ensure that the hoop house remains intact during high winds and inclement weather
Step 3: Set up the Base of the Hoop House
- Do not use any pressure treated wood
- Pressure treatment is not ideal for plants, produce, or livestock
- If using pressure treated wood, leave outside in the rain for several weeks prior to construction to allow the pressure treatment to fade
- Cedar or Locust wood works best if you can afford to use it
- Rot resistant lumbar works best and is ideal
- Set your frame in place and measure corner to corner to ensure accuracy
Step 4: Set up the Ground PVC Pipes
- Set PVC stakes every 36 inches along the long sides of the frame
- Cut the bottom of the PVC stake at an angle to ensure proper fit and ease of driving the stakes
- Use an old piece of wood between the top of the stake and a hammer to drive each stake into place along the long sides
Step 5: Connect the Ridgeline
- Cut each PVC piece a little shorter than 21’ for increased stability
- Connect at the top using 34” sections of 3/4” PVC
- Use rubber mallet to set in as far as you possibly can to ensure a good fit and durability
Step 6: Install the PVC Hoops
- The two ends of each hoop should easily slide over the ends of each stake – especially if you have a helper for this step!
- Connect the hoops at the top with 34” sections of ¾” PVC
Step 7: Cover the Hoop House with Durable Plastic
- Before installing plastic, be sure to apply durable protective tape along all edges of the frame that may come into contact with the plastic
- This ensures that the plastic does not wear out as it comes into contact with the frame
- Your best choice for plastic is 6 mL UV protected greenhouse plastic
- This type of plastic lasts 4-5 years
- It is the most durable
Step 8: Make the Ends / Doors of the Hoop House
- Do this step before setting the plastic in place to ensure proper length
- Cut two 10 x 12.5’ pieces of the greenhouse plastic and lay one over each end hoop of the hoop house
- The hoop should be entirely covered with at least one foot of plastic on the ground
- Use poly pipe clips to secure the plastic to each end hoop
- Cut down the middle of the plastic to make the “door”
- Use twine or heavy water/milk jugs to hold doors open and closed
- This is a relatively easy to way to create an entrance / exit to your hoop house
Step 9: Stretch the Plastic
- This step is best performed with three people on a warm, sunny day to ensure that the plastic stretches to its optimum capability
- Roll the plastic out so that it can stretch in the sun
- Spread the plastic over the hoop house and secure it to the top and ends with lathe strips
- To ensure proper fit, nail the plastic to the frame
- Tip: Return on a hot day to tighten the plastic and re-nail it
You have now successfully built a hoop house. Congratulations! You are ready to grow an extensive array of produce for several months compared to most gardeners and homesteaders. If you are one who enjoys taking your produce to the local Farmer’s Market, you will be one step ahead of the competition. If you’re one who enjoys canning, you will benefit from an increased supply of food for your pantry.
There are many benefits to building a hoop house, especially if you are a homesteader or enthusiastic gardener. A hoop house makes it possible to grow an extensive variety of plants and can extend your growing season and produce production by months every year. A hoop house is relatively easy to construct and inexpensive to build. It is a durable and functional way to also house livestock such as chickens and other small animals. A hoop house can be up to 500% cheaper to construct and maintain than conventional storage buildings, or even a traditional greenhouse, given the low-cost maintenance and revenue generated from the simple construction.
You may find yourself asking, “What is the difference between a hoop house and a traditional greenhouse?” There are actually some very distinct differences between the two.
- A greenhouse is a heated plant “nursery.” It requires a power source and is more expensive to maintain.
- A hoop house is only used for season extension and does not require a power source. It is relatively inexpensive to maintain.
- Constructing a hoop house is much easier, and more cost effective, than constructing a greenhouse.
Many folks are more familiar with a traditional greenhouse versus a hoop house. However, there are many benefits to constructing a hoop house versus building a traditional greenhouse.
- A hoop house will extend the growing season at a fraction of the cost of a traditional greenhouse.
- A hoop house can be used to house livestock, such as chickens or other small animals without having to build a separate structure for them.
- A hoop house can be used to harvest produce even when there is snow on the ground.
- A hoop house protects your produce from storms or other inclement weather.
- A hoop house also protects your produce from rodents or pests.
- A hoop house allows you to grow high-value produce that growing outdoors would not allow, and at the fraction of the cost of growing in a traditional greenhouse.
- A hoop house is much easier to build, in fact, you can build it yourself!
Benefits to building a hoop house versus building a greenhouse
- A hoop house can be mobile
- You can construct it so that you can move it from location to location throughout the season, or from year to year
- There is no need to run electricity to a hoop house
- In an extensive cold, you can build a non-electric rocket furnace to keep plants warm
- Constructing a greenhouse requires professional assistance, while you can construct your own hoop house, in a day or two, given the instructions above, with a few helpers of course!
Enjoy your new hoop house and all of the benefits that come along with it! A few days of construction and you will be well on your way to, not only extending your growing season, but extending your profit as well. Your family, your customers, and your livestock will thank you for your short time and effort to construct this simple structure.
Related Questions
How To Build A Small Greenhouse With PVC Pipe
You’ll need, PVC pipe cut to appropriate lengths, 36” long rebar (used for placing the pipes in the ground), connecting pipes, PVC cement (to stick the pipes and the connectors together), zip ties, plywood (for the ends of the greenhouse, an old screen door with hinges, and a plastic sheet (to cover the frame). For in-depth info, see our full article.
How to build a large hoop house?
To build a large hoop house, you’ll likely want to use more sturdy materials. For example, instead of PVC pipe for the main structure, you’d want to use metal pipe, like electrical conduit pipe. Otherwise, there’s little difference between a small vs. large hoop house.
What is the difference between a greenhouse and a high tunnel (or hoop house)?
The main differences between a greenhouse and a tunnel are that in a greenhouse, plants are usually grown in pots, whereas in a tunnel, plants grow directly in the ground like in a regular garden. Also, greenhouses are usually designed to use heaters, evaporative cooling, and ventilation systems.